Tuesday, July 26, 2011

Backyard tree planting

I've been intrigued by the current series of bus shelter posters proclaiming "You need a backyard tree!". (They're pretty funny - two kids trying to hold up a hammock for their dad to nap in, for instance). I finally got around to visiting mybackyardtree.ca, and am I ever impressed!

There's a huge variety of trees and shrubs available. You get a consultation with an arborist, then buy a tree. They're $140 to $165, come 5 to 8 feet tall depending on the variety, and that price includes it being planted for you!

I've filled out the questionnaire to have someone call me about a consultation, so I'll report back on how that goes.
Don't file... pile!

One of the great things about this blog is that I can go back and see what interested me before, and renew my enthusiasms.

For instance, looking at old post headings sent me back to DIYPlanner.com, where I found a link to this awesome video on "file-piles". It's a system that combines the best of a filing system, with the best of a "piling" system, which is my natural tendency. It's really true that when I force myself to file, I get less productive.

The one filing system that I have and use is the financial system my husband and I set up. It takes exactly one filing cabinet drawer, and works beautifully. It came from some book about couples finance (not surprisingly!). As Rob points out in the video, filing works well when you share a system.

I'm going to finally add a 15-minute block to my lunch routine to deal with paper clutter. I'll use a regular binder (which I have tons of) and try this out tomorrow.

A real-life kitchen!

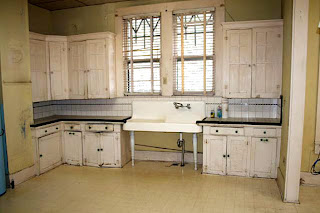
Further to this post, I found a real estate listing today that is almost an exact replica of that "ideal" 1920s kitchen.

I'm fascinated to see such an untouched kitchen. It needs a good scrubbing, but I don't think I've seen anything that old outside of a museum.

Too bad the house it's in is in Texas!

Here's a little version of the original picture, for comparison:

Thursday, July 21, 2011

Roof Framing

After a little period of being stuck and needing to refer to a couple of library books, my virtual framing project is back underway. I've got all the walls framed, and the main roof. I haven't quite figured out how I want the living room roof to be yet, but I'm leaning towards a low-sloped hip roof. I'll handle the gable ends next. I've been helped a lot by the blog of a guy named Jonathan who has built a similar house. (Here's his post on framing his roof.) His detailed pictures have helped me to visualize what I need to do.

The rafters and ridge beam turned out to be easy in SketchUp, but I wasn't sure how to handle the top of the walls. I went with a 2x4 on end, then another flat on top, with the loft 2x4 supports running in between the ones on end. (See the detail).

Unfortunately it's a little difficult to make anything out in the pictures now, with it being just a forest of 2x4s! I'm not sure it will be any better when I start putting plywood sheathing on, since it will then be a box of wood with a pointy top. Not very interesting.

Monday, July 18, 2011

Virtual Framing - end walls up

The linoleum is down and the end walls are (virtually) up! The beauty of SketchUp is that I don't need any bracing to leave them like this overnight.

The far wall will end up being one of the bathroom walls, designed to face north. The extra stud is at the edge of where the shower will be, as a place to fasten it.

The near wall is the end of the living room, designed to face south. The three rough openings are for 22" by 44" double-hung windows.

The walls framed on top of the finish flooring is a bit unusual, but it eliminates the weight and thickness of plywood that would normally go under the hardwood floor.

Sunday, July 17, 2011

Virtual Framing

I love Google SketchUp, and although it's one of my enthusiasms I haven't mentioned it yet. I don't have the time, money, or space to start building my tiny house, but I can mock it up in SketchUp!

At the left I have the floor framing - the indented bits are where the wheel wells of the trailer stick up into the walls a bit. I left the standard Google character in for an idea of size, but it's roughly 7' by 18'.

And here's flooring laid. There is 3/4" plywood on the right to go underneath linoleum for the kitchen and bathroom, and since I'm dreaming big here, there's 6" wide reclaimed Douglas Fir planks on the left for the living/dining/everything else area. The plywood texture is built in to SketchUp, but I used their "create texture" option to paste in a photo of floorboards which it used for the flooring. It looks a little odd, but gives an idea of the overall colour, at least.